The case for state machines in client-side applications
Recently I had to implement a very simple feature for the HR application Humaps. Within the product, we want to be able to show a dialog with release notes for its users. This dialog had very simple requirements that needed to be fulfilled.
- The user should always be able to view and hide this dialog with the release notes.
- When there is a new major version number since the last visit, the release notes are automatically shown.
- The user has to be logged in to view the release notes.
Simple enough right? I implemented the dialog in a component, and used a boolean for its state management. Classic mistake on my end, as several issues exist with this implementation.
The rabbit hole of issues #
The first found issue was a simple mistake on my end. I forgot to add the check to see if the user was logged in or not. This resulted in the release notes showing up before the user was redirected to the login page. Easily solvable right? Just add the check if the user is logged in or not on the initial load, and we are done.
This worked in most cases, as the login page was via an external application. This means that the application would be reloaded after the user logs in. But a new issue happened right here. The dialog would not automatically open for new users!
The state to determine if a user is logged in or not is stored in the application's cache. The dialog for the release notes is attached to the window sooner than when the application cache was updated with the user's information. This means that the initial state of the dialog is already set, and the user is not yet flagged as logged in at that point.
The solution #
At this point, the implementation of a simple feature can become unmaintainable. The state is updated in several places, and triggers are set in life-cycle methods. A better way to solve this is using state machines. It becomes a lot easier to visualize and think about the edge cases. So let's visualize the state machine belonging to the solution of this particular case.
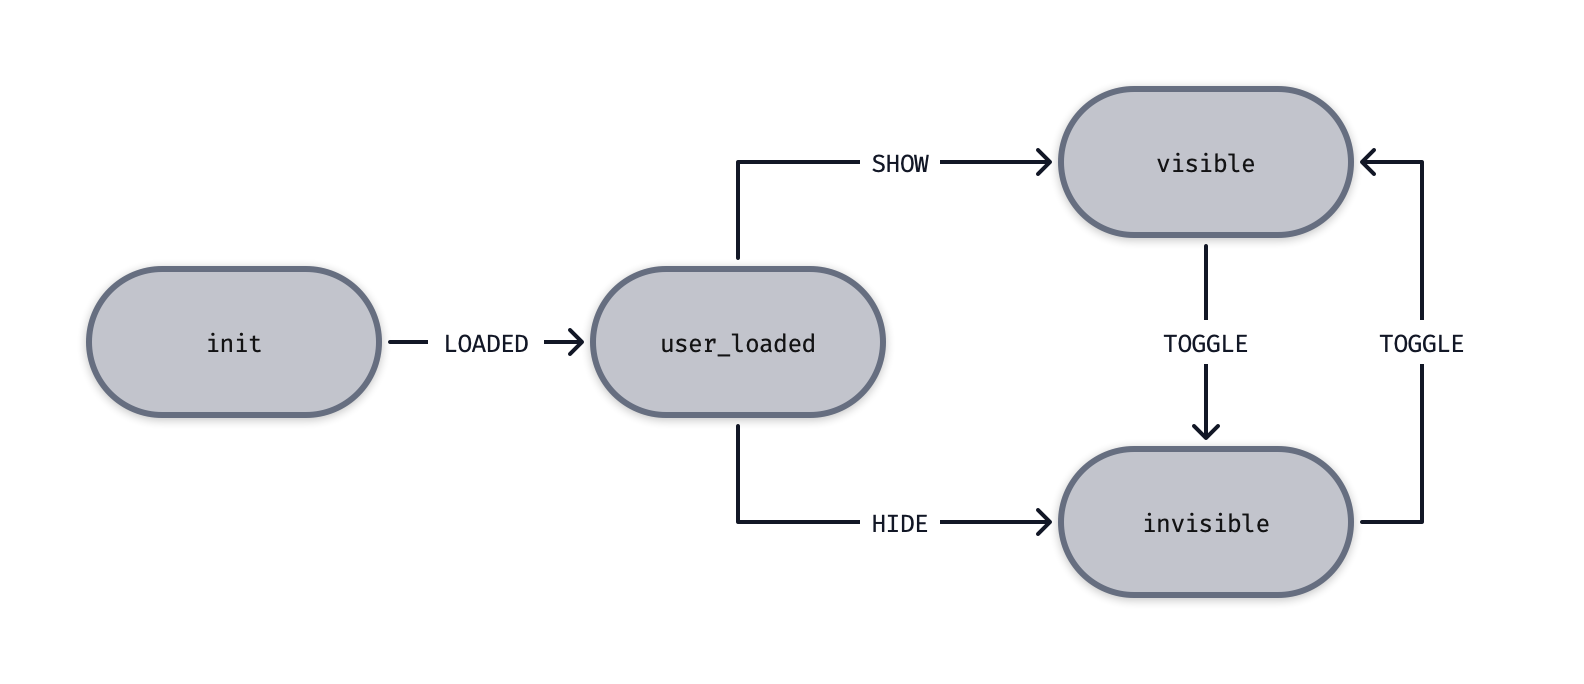
A simple machine with only four states. The visible and invisible states speak for themselves. These are equal to the original boolean I used. Only when the state equals visible will we show the dialog. The init state is used as the state when the application is still initializing. Only after the user's information is put in the application, the real magic of the state machine is shown.
You could argue that it would be enough to create a callback after the user is loaded. In this callback, we determine which event to trigger on the state machine, either HIDE or SHOW. In a simple state machine this would be proper implementation.
But in the diagram, we see a user_loaded state. That is because the implementation I used allows for actions. These are callbacks that can be triggered for instance when we "enter" a state. It now looks something like the code below:
import { send } from "cogwheel";

const config = {
  init: "init",
  states: {
    init: { LOADED: "user_loaded" },
    user_loaded: {
      SHOW: "visible",
      HIDE: "invisible",
      _entry: [
        () => {
          if (firstLogin) return send({ type: "SHOW" });
          else if (newVersion) return send({ type: "SHOW" });
          return send({ type: "HIDE" });
        },
      ],
    },
    visible: { TOGGLE: "invisible" },
    invisible: { TOGGLE: "visible" },
  },
};
Because of these actions, I am now able to put the logic of determining the correct path in the state machine itself, instead of a function triggered somewhere else. This allows me to keep all logic in one place, instead scattered around one or more files. The only thing happening outside of this machine is the LOADED and TOGGLE events.
Wrapping up #
Once again, state machines saved the day for me. Features that seem simple can become unmaintainable due to unforeseen state management issues. Whenever this happens, it often becomes a smart idea to move towards a state machine implementation. An implementation like XState or Cogwheel might seem daunting at first. But, you will find soon enough it helps you avoid issues in the future.